Today I worked on configuring forms based authentication for SharePoint 2010. Using forms based authentication automatically means using claims based authentication in Sharepoint 2010.
I tried using both an LDAP provider and a SQL provider. My initial goal was to get them both working in the same environment, but after a lot of hours of staring at XML in web.config files I gave up on that one. Instead I created separate environments for using LDAP and SQL providers. Because of this I will also write two separate blog posts. This one will explain how to set up forms based authentication while using an LDAP provider.
If you want to configure forms based authentication for use with a SQL provider check out my other post here.
Using an LDAP provider with forms based authentication means that users will use their Windows or AD account to log in. However, because forms based authentication will be used they don’t get the usual popup, but they will use a sign-in page to log in.
These are the steps you will need to take to set it up:
Create a new web application
- Go to Central Administration
- Go to Application Management
- Click on Manage Web Applications
- Click New
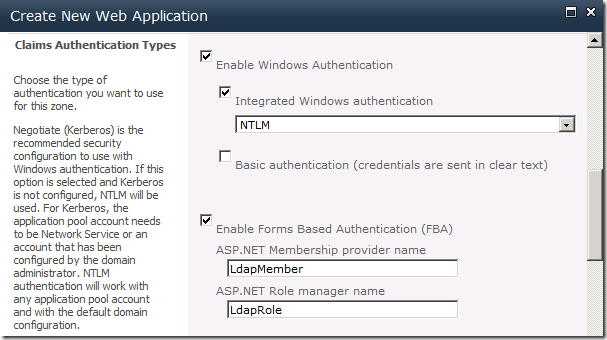
- Select Claims Based Authentication
- Identity Providers
* Check the Enable Windows Authentication box or you won’t be able to crawl the site
* Check the Enable ASP.NET Membership and Role Provider checkbox
* In the Membership provider name edit box, type LdapMember
* In the Role provider name edit box, type LdapRole

Create a new site collection
- Go to Central Administration
- Go to Application Management
- Click Create site collections
- Select the newly created web application
- Fill in a name and select a template
Adjust the web.config of the Central Administration site
- Open the Central Administration site's web.config file
- Find the <system.web> entry
- Paste the following XML directly below it
<membership>
   <providers>
      <add name="LdapMember"
         type="Microsoft.Office.Server.Security.LdapMembershipProvider,
 Microsoft.Office.Server, Version=14.0.0.0, Culture=neutral,
 PublicKeyToken=71e9bce111e9429c"
         server="dc.sharepoint.com"
         port="389"
         useSSL="false"
         userDNAttribute="distinguishedName"
         userNameAttribute="sAMAccountName"
         userContainer="OU=SPUsers,DC=sharepoint,DC=com"
         userObjectClass="person"
         userFilter="(ObjectClass=person)"
         scope="Subtree"
         otherRequiredUserAttributes="sn,givenname,cn" />
   </providers>
</membership>

<roleManager enabled="true" defaultProvider="AspNetWindowsTokenRoleProvider" >
   <providers>
      <add name="LdapRole"
         type="Microsoft.Office.Server.Security.LdapRoleProvider,
Microsoft.Office.Server, Version=14.0.0.0, Culture=neutral,
PublicKeyToken=71e9bce111e9429c"
         server="dc.sharepoint.com"
         port="389"
         useSSL="false"
         groupContainer="OU=SPUsers,DC=sharepoint,DC=com"
         groupNameAttribute="cn"
         groupNameAlternateSearchAttribute="samAccountName"
         groupMemberAttribute="member"
         userNameAttribute="sAMAccountName"
         dnAttribute="distinguishedName"
         groupFilter="(ObjectClass=group)"
         userFilter="(ObjectClass=person)"
         scope="Subtree" />
   </providers>
</roleManager>
- In the above XML the server tag is the server name of the domain controller. The user and group containers are the containers in AD where the users and groups you want to use for authentication reside. If you don’t know what the path to your container is, but you do have access to AD you can find out what the container is.
- Go to the domain controller
- Open Active Directory Users and Computers
- Select a user or a group in the container
- Right click and select All Tasks => Resultant Set Of Policy (Planning)
- Click the browse button next to Container and select the container
- This will give you the path to the container
- Double check whether the <membership> and <rolemanager> entries only exist ones. Delete any double entries.
- Paste the following XML below the <PeoplePickerWildcards> entry
<clear />
<add key="AspNetSqlMembershipProvider" value="%" />
<add key="LdapMember" value="*"/>
<add key="LdapRole" value="*"/>
Adjust the web.config of the Security Token Service (STS) virtual directory
NB: you will need to make the changes to the Security Token Service virtual directory on each server hosting either Central Administration or the claims based web application
- Open the Security Token Service (STS) virtual directory's web.config file
- Find the </system.net> entry
- Add a <system.web> entry directly below it
- Paste the following XML directly below the <system.web> entry
<membership>
   <providers>
      <add name="LdapMember"
         type="Microsoft.Office.Server.Security.LdapMembershipProvider,
 Microsoft.Office.Server, Version=14.0.0.0, Culture=neutral,
PublicKeyToken=71e9bce111e9429c"
         server="dc.sharepoint.com"
         port="389"
         useSSL="false"
         userDNAttribute="distinguishedName"
         userNameAttribute="sAMAccountName"
         userContainer="OU=SPUsers,DC=sharepoint,DC=com"
         userObjectClass="person"
         userFilter="(ObjectClass=person)"
         scope="Subtree"
         otherRequiredUserAttributes="sn,givenname,cn" />
   </providers>
</membership>

<roleManager enabled="true">
   <providers>
      <add name="LdapRole"
         type="Microsoft.Office.Server.Security.LdapRoleProvider,
 Microsoft.Office.Server, Version=14.0.0.0, Culture=neutral,
PublicKeyToken=71e9bce111e9429c"
         server="dc.sharepoint.com"
         port="389"
         useSSL="false"
         groupContainer="OU=SPUsers,DC=sharepoint,DC=com"
         groupNameAttribute="cn"
         groupNameAlternateSearchAttribute="samAccountName"
         groupMemberAttribute="member"
         userNameAttribute="sAMAccountName"
         dnAttribute="distinguishedName"
         groupFilter="(ObjectClass=group)"
         userFilter="(ObjectClass=person)"
         scope="Subtree" />
   </providers>
</roleManager>
- Add a </system.web> entry directly below it
Adjust the web.config of the claims based web application
- Open the claims based web application's web.config file
- Locate the <membership> entry
- Paste the following XML directly below the <Providers> entry
<add name="LdapMember"
   type="Microsoft.Office.Server.Security.LdapMembershipProvider,
Microsoft.Office.Server, Version=14.0.0.0, Culture=neutral,
 PublicKeyToken=71e9bce111e9429c"
   server="dc.sharepoint.com"
   port="389"
   useSSL="false"
   userDNAttribute="distinguishedName"
   userNameAttribute="sAMAccountName"
   userContainer="OU=SPUsers,DC=sharepoint,DC=com"
   userObjectClass="person"
   userFilter="(ObjectClass=person)"
   scope="Subtree"
   otherRequiredUserAttributes="sn,givenname,cn" />
- Locate the <roleManager> entry
- Paste the following XML directly below the <Providers> entry
<add name="LdapRole"
   type="Microsoft.Office.Server.Security.LdapRoleProvider,
Microsoft.Office.Server, Version=14.0.0.0, Culture=neutral,
PublicKeyToken=71e9bce111e9429c"
   server="dc.sharepoint.com"
   port="389"
   useSSL="false"
   groupContainer="OU=SPUsers,DC=sharepoint,DC=com"
   groupNameAttribute="cn"
   groupNameAlternateSearchAttribute="samAccountName"
   groupMemberAttribute="member"
   userNameAttribute="sAMAccountName"
   dnAttribute="distinguishedName"
   groupFilter="(ObjectClass=group)"
   userFilter="(ObjectClass=person)"
   scope="Subtree" />
- Paste the following XML below the PeoplePickerWildcards entry
<clear />
<add key="AspNetSqlMembershipProvider" value="%" />
<add key="LdapMember" value="*"/>
<add key="LdapRole" value="*"/>
Add a user policy to the web application
- Go to Central Administration
- Go to Application Management
- Click on Manage Web Applications
- Select the claims based web application
- Click on User Policy
- Click on the Add Users link
- Click the Next button.
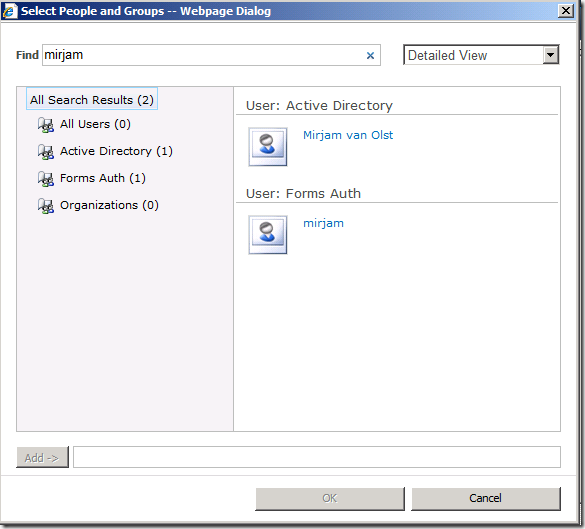
- Click the Address Book icon.
- Type in the NT login name or account name and click the search button. If it’s working correctly you should see at least two entries for the account – one that is for the user’s Active Directory account, and one that is for that same account but which was found using the LDAP provider.
- Select the account in the User section and click the Add button
- Click the OK button
- Check the Full Control checkbox, then click the Finish button

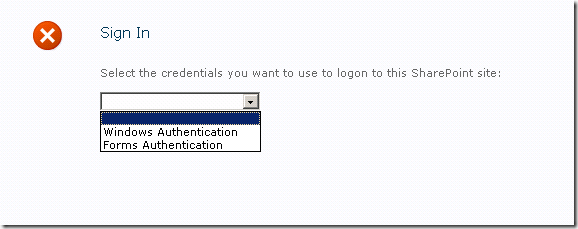
You can now browse to the web application and log in using forms based authentication.

Select Forms Authentication in the dropdown

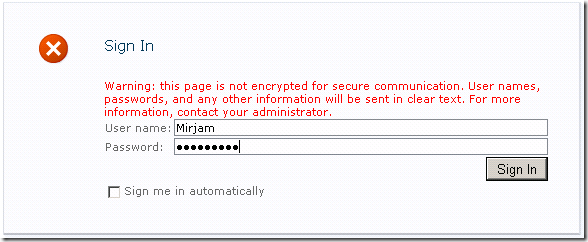
And fill in the appropriate user name and password.
I used the following blog posts to get things working, so I would like to thank Steve, Ali and TechNet :-):
http://blogs.technet.com/speschka/archive/2009/11/05/configuring-forms-based-authentication-in-sharepoint-2010.aspx
http://blogs.msdn.com/alimaz/archive/2009/10/30/configuring-fba-in-sharepoint-server-2010-beta-2.aspx
http://technet.microsoft.com/en-us/library/ee806890(office.14).aspx